 AIVIDEOSUGC
AIVideosUGC workspace guide
The workspace guide, chapter by chapter.
A step-by-step manual for the creation workspace: one chapter per module, numbered steps and real annotated screenshots — so a first-time user can go from an idea to a finished, subtitled ad without leaving the guide.
Pick a path, follow the chapters.
Most people don't need all twelve chapters. Three curated paths chain the chapters into the three things the workspace is actually used for.
Path A · ~8 min
Your first video today
From a blank prompt to a rendered, downloadable video — the full core loop.
0102030411
Path B · ~10 min
From product link to ad
Sellers with a live product page: import, build the product library, generate variations.
0107080911
Path C · ~7 min
Polish and deliver
You already have a video: track the job, subtitle it, manage your library and account.
04101112
Three ideas that explain every screen.
Credits & confirmation
Every generation shows its estimated cost before it runs. Confirming holds the credits; a failed job returns them automatically. Nothing is ever charged twice.
Drafts & statuses
A job is a draft until you confirm it, then moves through generating → finishing → completed. Failed jobs show a human-readable reason and always offer a retry.
15-day retention
Generated videos are kept for 15 days, then automatically deleted. Download anything you want to keep — the guide shows where.
How a generation job runs
Applies to every tool · the loop you will repeat the most
Video and image tools all share the same job loop. Understand it once and every chapter after this one is just different inputs. Estimated cost is always shown before you commit — you decide with the price on screen.
Describe what you want
Type a prompt, drop product photos, or paste a product link — depending on the tool. The composer shows an
Optimizebutton that rewrites your draft into a structured shooting script.Review the quote
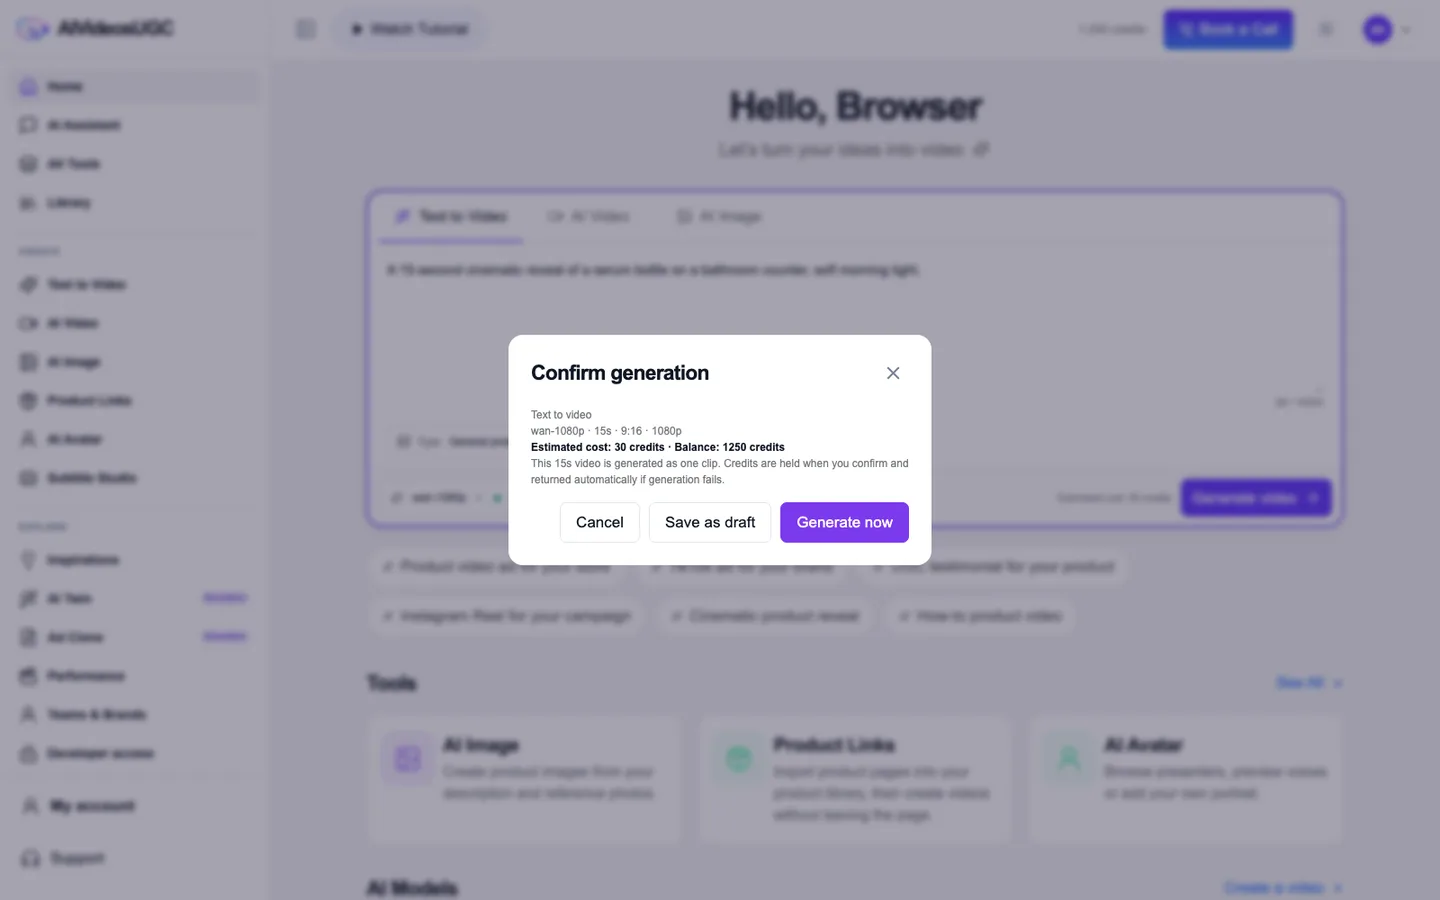
The composer footer shows the estimated cost live. When you press generate, a confirmation modal restates the cost and your current balance before anything runs.
Confirm — or save as draft
Generate nowholds the credits and starts the job.Save as draftkeeps everything you entered without spending anything. If generation fails, held credits are returned automatically.Track it in the Library
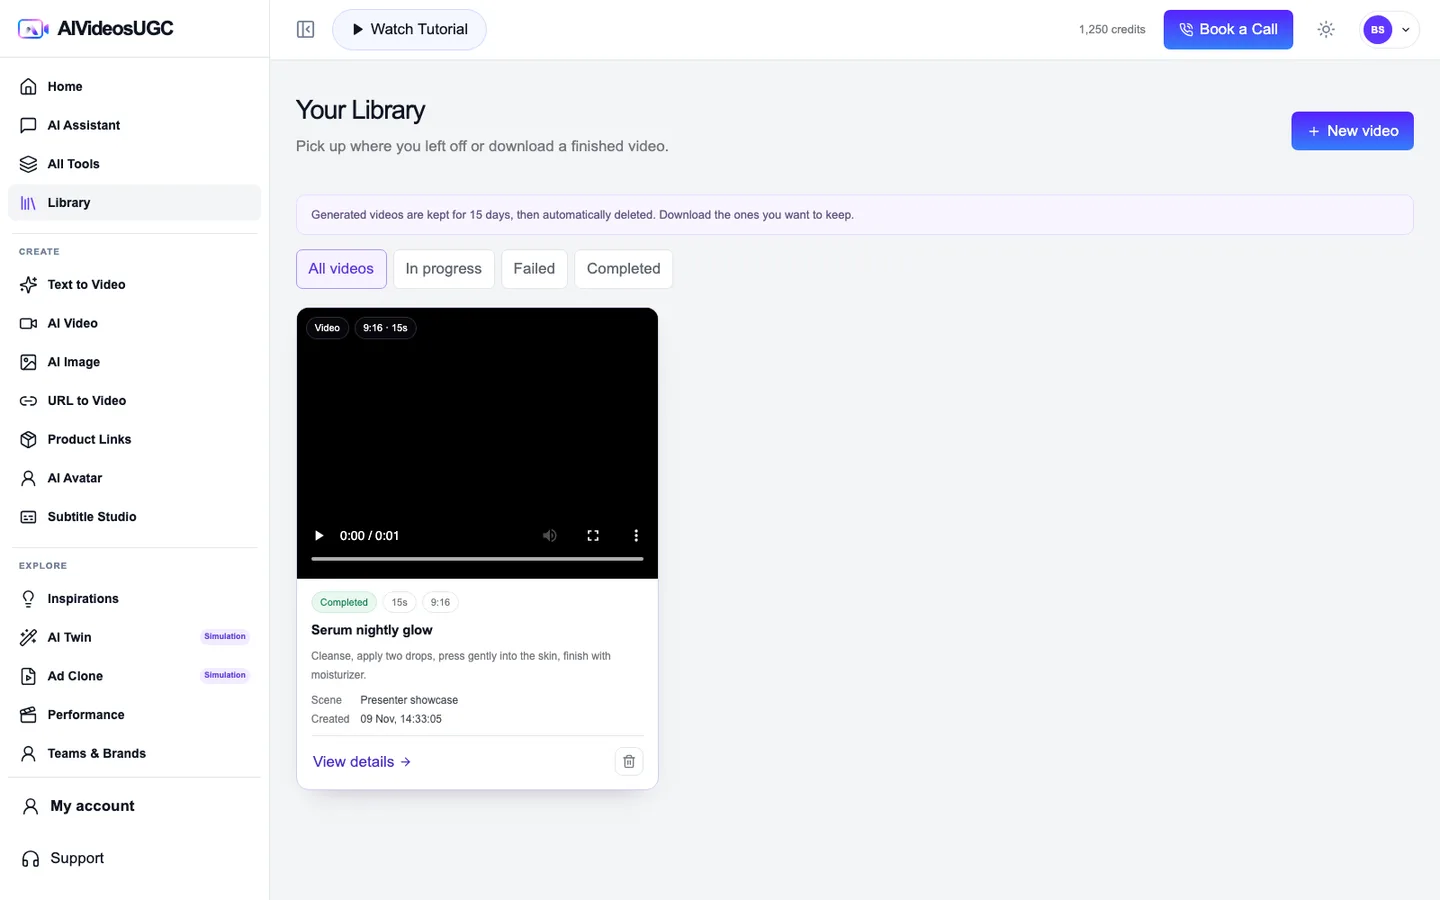
Jobs move through generating → finishing your video → completed. You can leave the page; the badge updates when you come back.
Open, download, keep
Finished results open in a details modal with
View detailsand download links. Generated videos are kept for 15 days — download anything you want to keep.
Good to know Guests can build a draft without an account — it is restored the moment you sign in.
Home & the composer
Route /app/create · your starting point every time
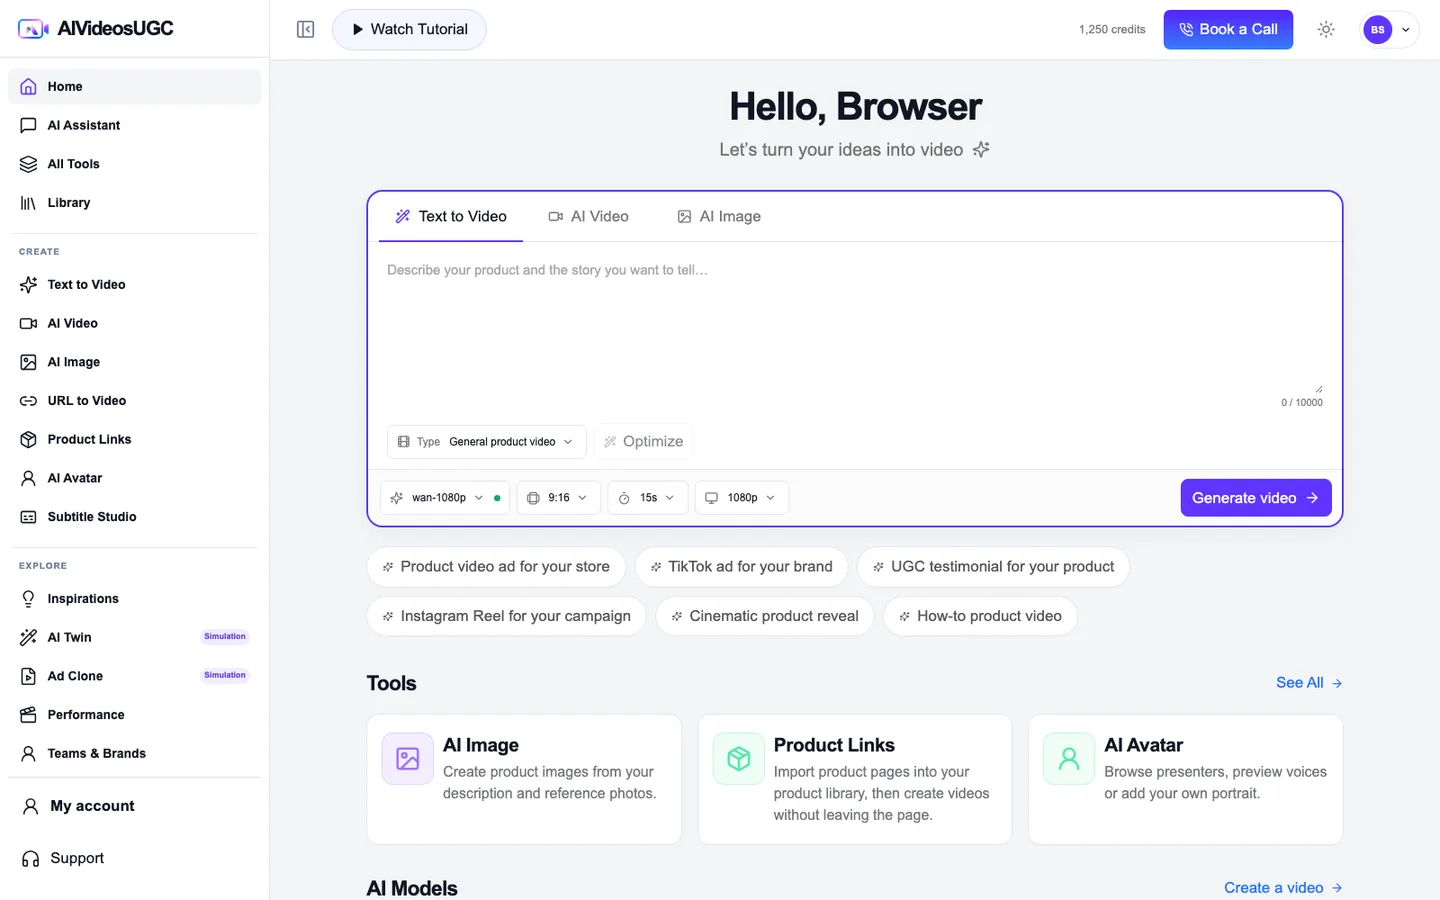
Home is one composer with three tabs — Text to Video, AI Video, AI Image — plus quick-start chips, the tool grid and your recent videos. Anything you start here can be continued from any other module.
Pick the right tab
Text to Video turns a written idea into one finished video. AI Video animates the references you attach. AI Image generates stills.
Write the prompt — or start from a chip
The quick-start chips — "Product video ad for your store", "TikTok ad for your brand", "UGC testimonial for your product", "Instagram Reel for your campaign", "Cinematic product reveal", "How-to product video" — prefill the composer with a proven starting prompt.
Set type, then Optimize
The
Typeselector picks the video family (General product video, UGC review, unboxing…).Optimizerewrites your prompt into the structured script the model expects.Model, format, duration, resolution
The setting row: model (wan-1080p and friends, with credit cost per duration), aspect ratio (9:16 …), duration (15s …), resolution (1080p).
Generate videostarts the run.
Good to know The composer is the same component in every tool module — learn it here and you know it everywhere.
Write it, attach it, send it
Route /app/create · the composer, start to submit
There is no multi-step editor to learn: a video starts with one prompt and your product photos. This chapter zooms into the composer form and the confirmation step; what happens after you submit is chapter 04.
Write the prompt
Describe the video you want in plain language — what the product is, what happens on screen, the mood. One clear paragraph is enough; the provider receives your text as the creative direction.
Attach product photos
Up to four photos, dragged or pasted in. They are sent to the provider as-is — the reference limit is set by what the model supports, not by a fixed template.
Type + Optimize
The
Typeselector picks the video family (General product video, UGC review, unboxing…).Optimizerewrites your prompt into the structured script the model expects.Model, format, duration, resolution
The setting row: model (with credit cost per duration), aspect ratio, duration, resolution. The footer shows the estimated cost live before you commit.
Confirm — or save as draft
Generate videoopens a confirmation modal: Confirm generation restates the estimated cost and your balance.Generate nowsubmits and holds the credits;Save as draftkeeps everything without spending anything. If generation fails, held credits are returned automatically.
Good to know Saving as a draft costs nothing — you only spend credits when you confirm a generation.
Track it & deliver
Route /app/create · from submit to download
After you confirm, the server runs the whole job on its own — there are no render steps to babysit. The editor turns into a progress panel, your Library tracks everything, and finished videos are yours to download for 15 days.
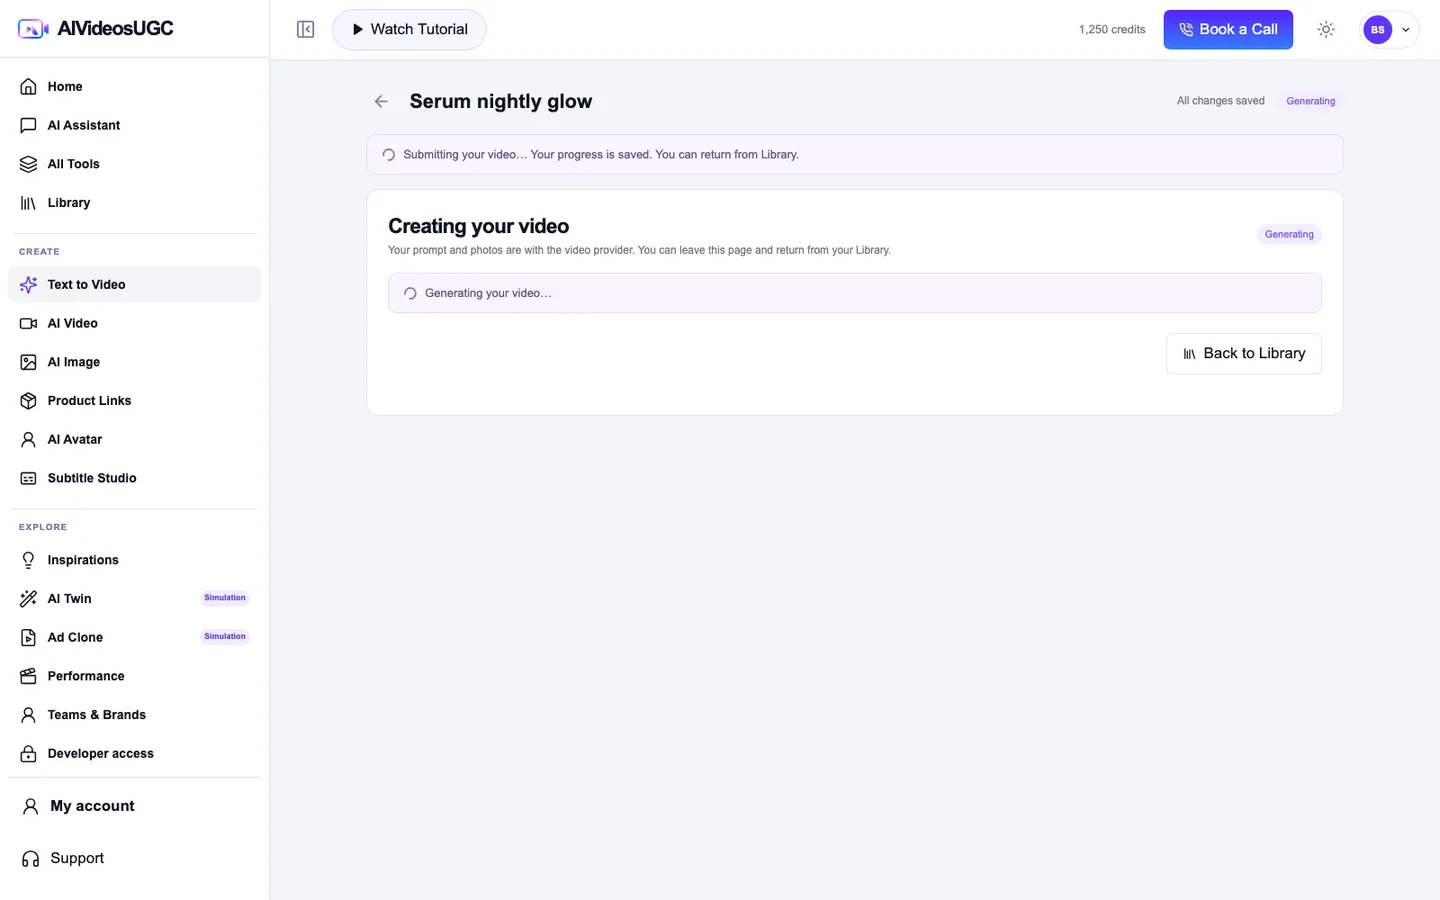
Watch the progress panel
Right after you confirm, the editor shows Creating your video — "Your prompt and photos are with the video provider. You can leave this page and return from your Library." The status moves from Generating your video… to Finishing your video….
Leave freely
You don't need to keep the page open. The Library badge updates while you work elsewhere — chapter 11 covers the filters.
Collect the video
When it's done the panel becomes Your video — "Your video is ready to download." — with the player,
Download video,Create another videoandBack to progress. Your Library keeps every finished video for 15 days.If it fails, retry in one click
A failed job shows Let's try that again with a plain-language reason —
Try againresubmits the same prompt and photos. Held credits are returned automatically on failure.
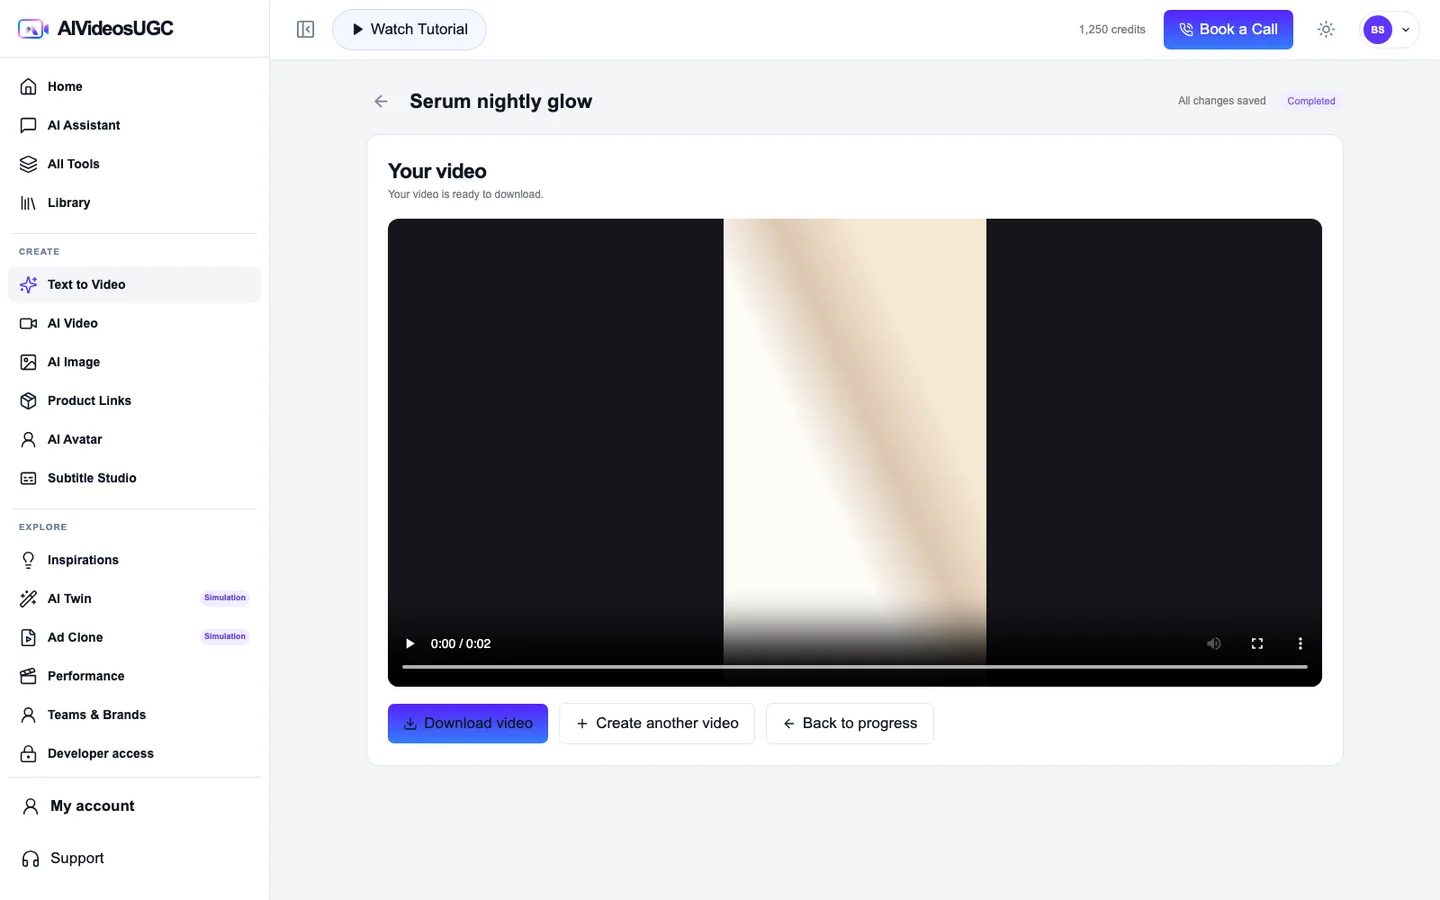
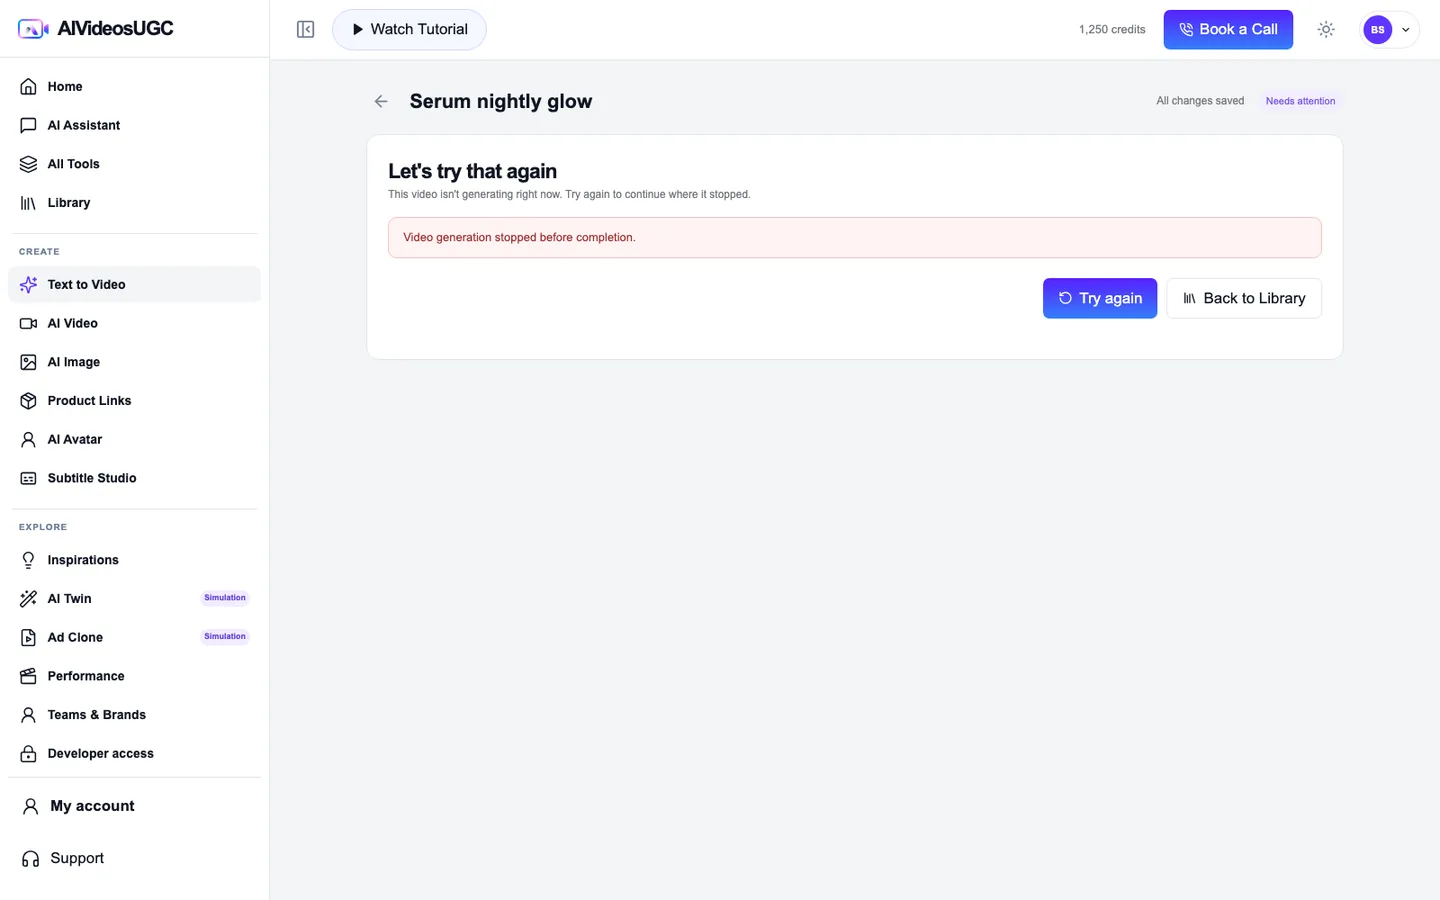
Good to know Generated videos are kept for 15 days — download what you want to keep, from the editor or your Library.
AI Video from references
Route /app/create/ai-video-generation · animate what you attach
This module is the composer in AI Video mode: your references drive the shot. Product photos are the baseline; video and audio references unlock motion and voice on supported models.
Attach references
1–4 product photos by drag or paste. On models that support them, reference video and reference audio slots appear — attach a motion clip or a voice sample to steer the result.
Type + Optimize
Choose the video family and let the optimizer structure your prompt around the references you attached.
Quote, confirm, generate
The same core loop: estimated cost → confirmation modal → the video lands in your Library.
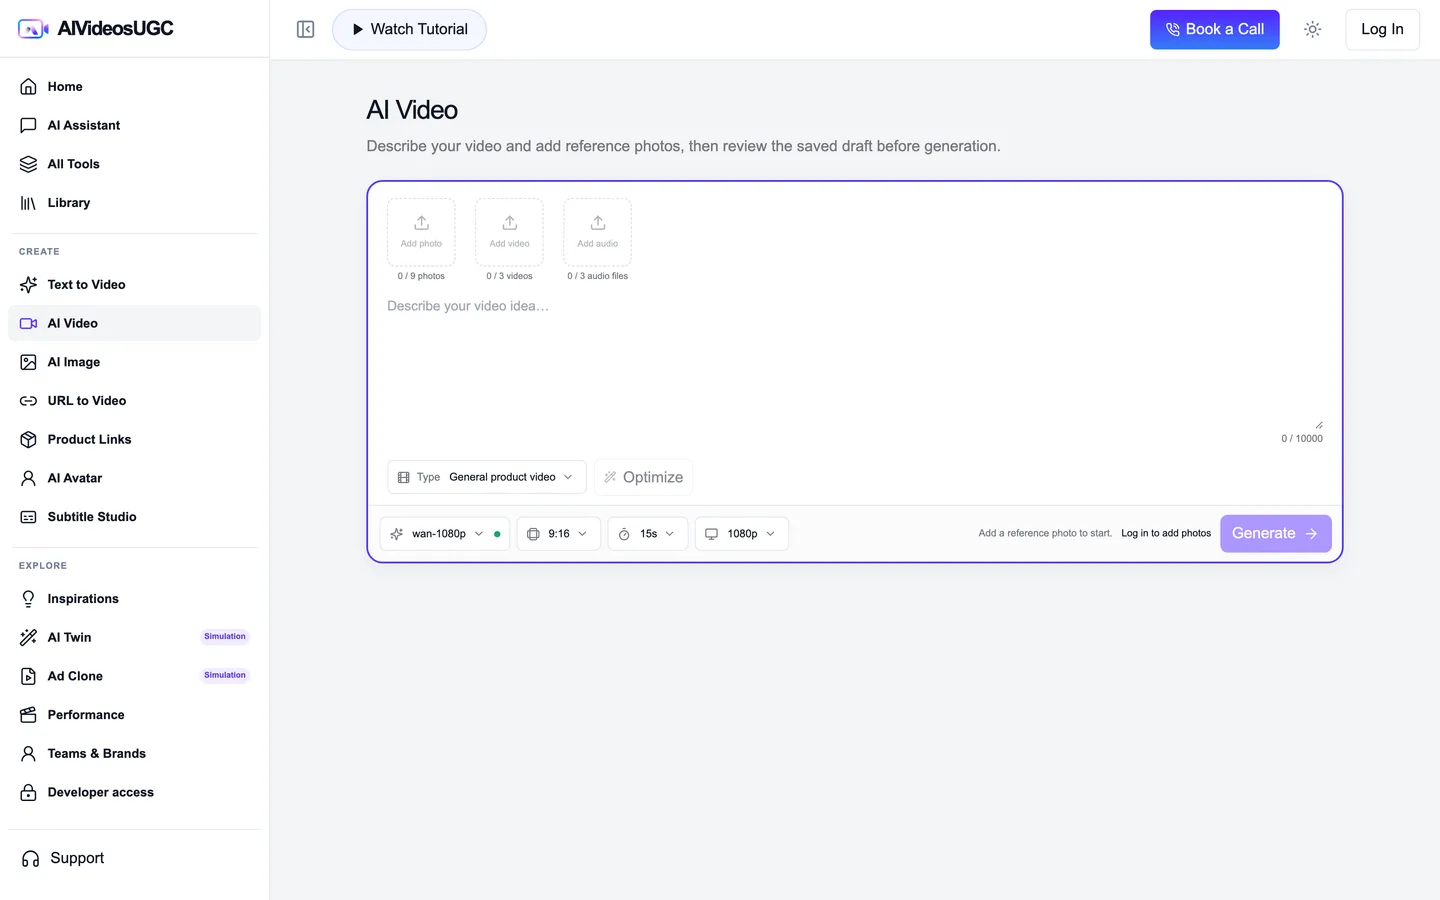
Good to know Reference slots depend on the selected model — switch models and the available slots switch with it.
AI Image
Route /app/create/ai-image-generation · stills with live pricing
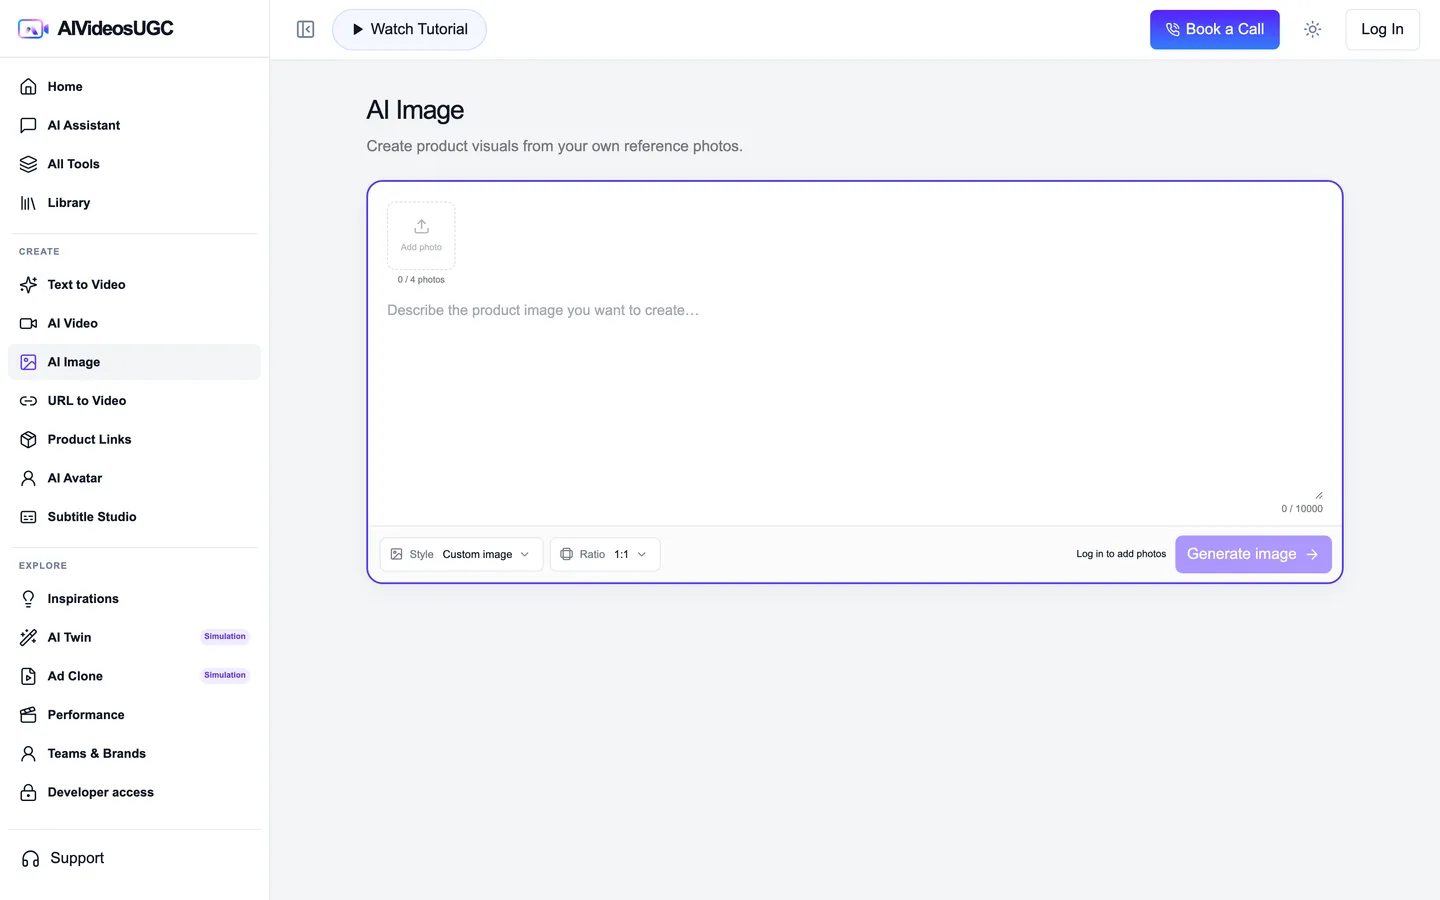
Image generation uses tool presets instead of storyboards. Results appear inline on the page with download links — they do not enter the video Library.
Pick a tool preset
Custom image, White background, Change background, Lifestyle photo, Model photo — each preset reshapes the form for its job.
Set ratio and references
Aspect ratio plus up to four product reference photos. The price line stays honest:
Add a product reference photo to see the price.Watch the price confirm
The line switches to
This generation costs N credits. If the price changes after you edit inputs, the button asks for a second click — that's the guard, not a bug.Collect the results
Queued and running cards show
N credits reserved; completed cards show Download links right in the grid.
URL to Video
Route /app/create/url-to-video · paste a link, get a draft
The fastest entry path for sellers: paste a live product URL and the importer reads the page for you. You confirm what it found, pick the hero photo, and land in a prefilled video draft.
Paste the product URL
Any public HTTPS product page. Blocked or unsupported pages return a specific reason — not a generic error.
Review the scrape preview
The importer shows the sourced title, description, detected images and a possible price — each with a confidence label, so you know what to trust.
Pick the photo and import
Choose the hero image and confirm. The import is saved into your product history.
Continue to the video draft
One click opens the product-demo scene form with the photo and brief already filled in.
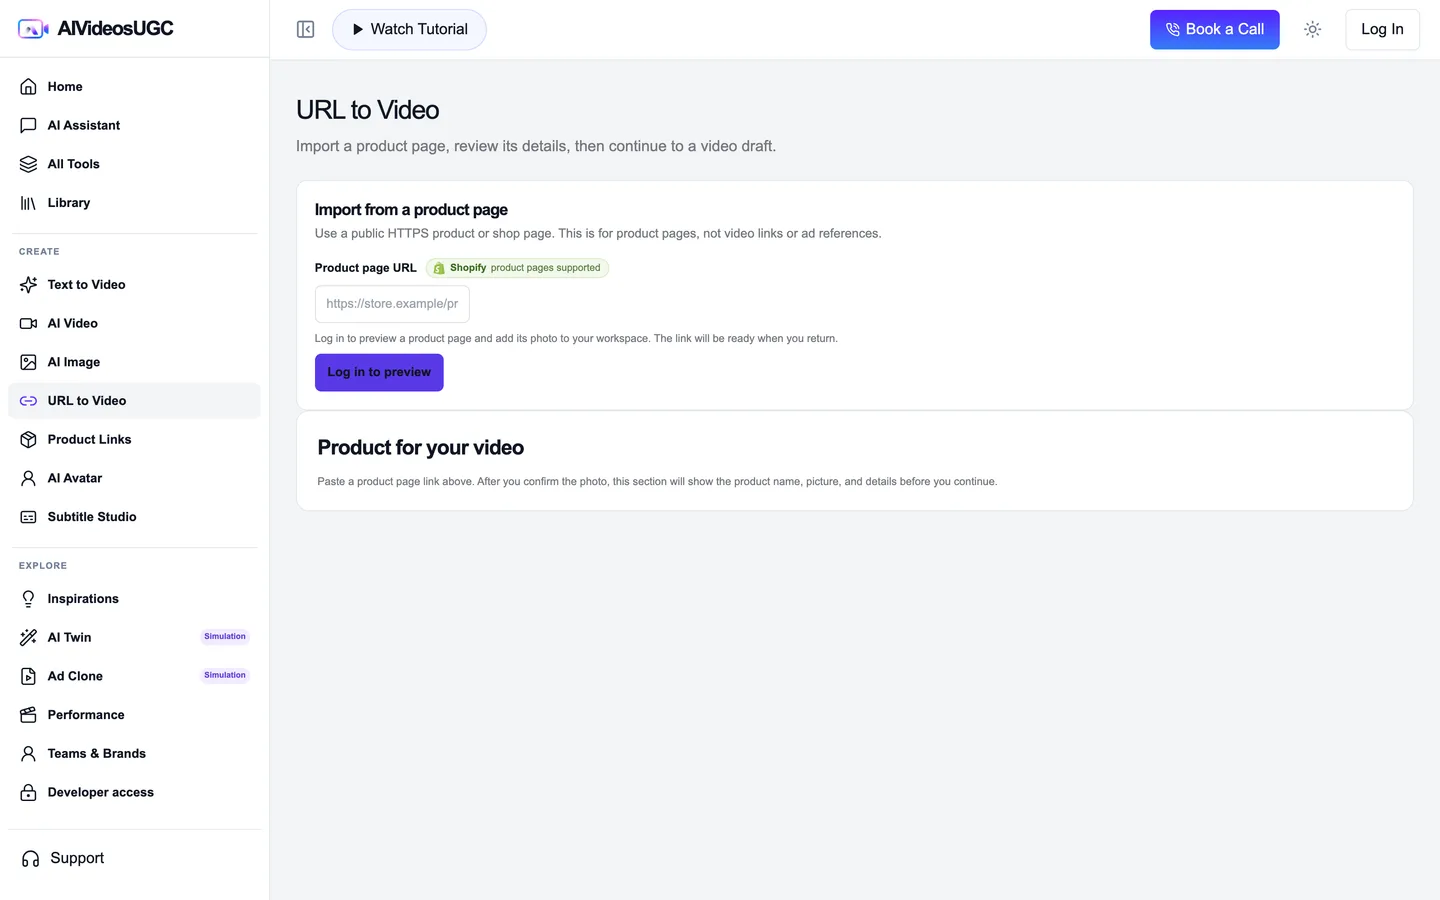
Good to know "Possible price" is read from the page and always marked unconfirmed — the video never quotes a price you didn't approve.
Product Links — your product library
Route /app/create/product-links · import once, generate many
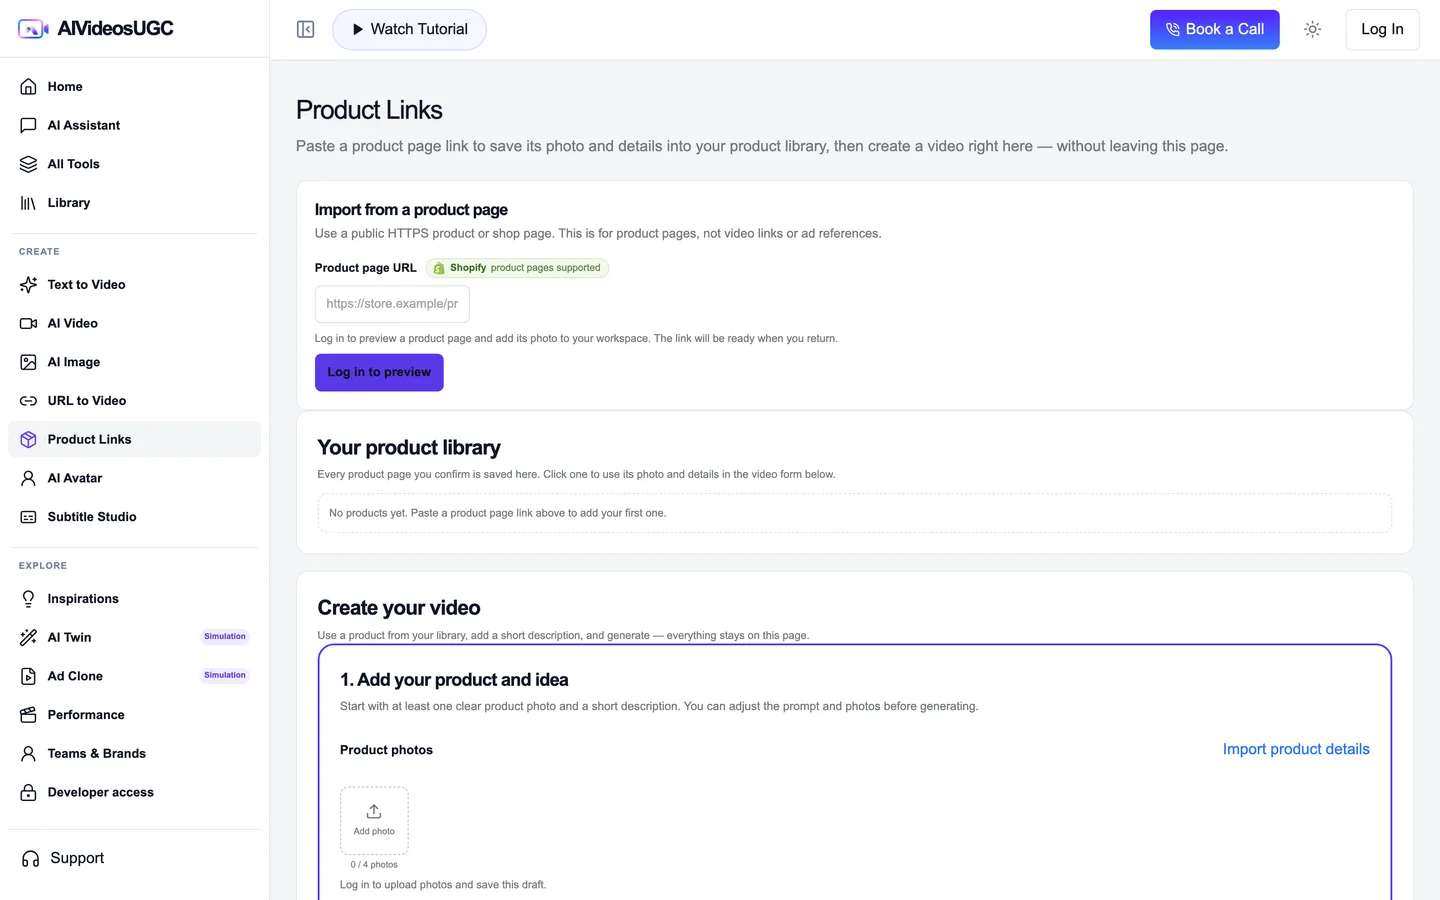
Everything you import lives in your product library with its photo, description and source. Generate again whenever you need a new variation — the page even builds videos inline without leaving.
Import products
Same importer as chapter 07. Each import becomes a library entry with thumbnail, description and source host.
Manage the library
Click an entry to backfill anything the scrape missed; delete entries you no longer need.
Create a video inline
The "Create your video" panel embeds the scene form right on the page. A live run banner tracks progress: "Generating your video" → "Your video is ready" with Download and Open Library.
AI Avatar studio
Route /app/create/ai-actors · a presenter for your product stories
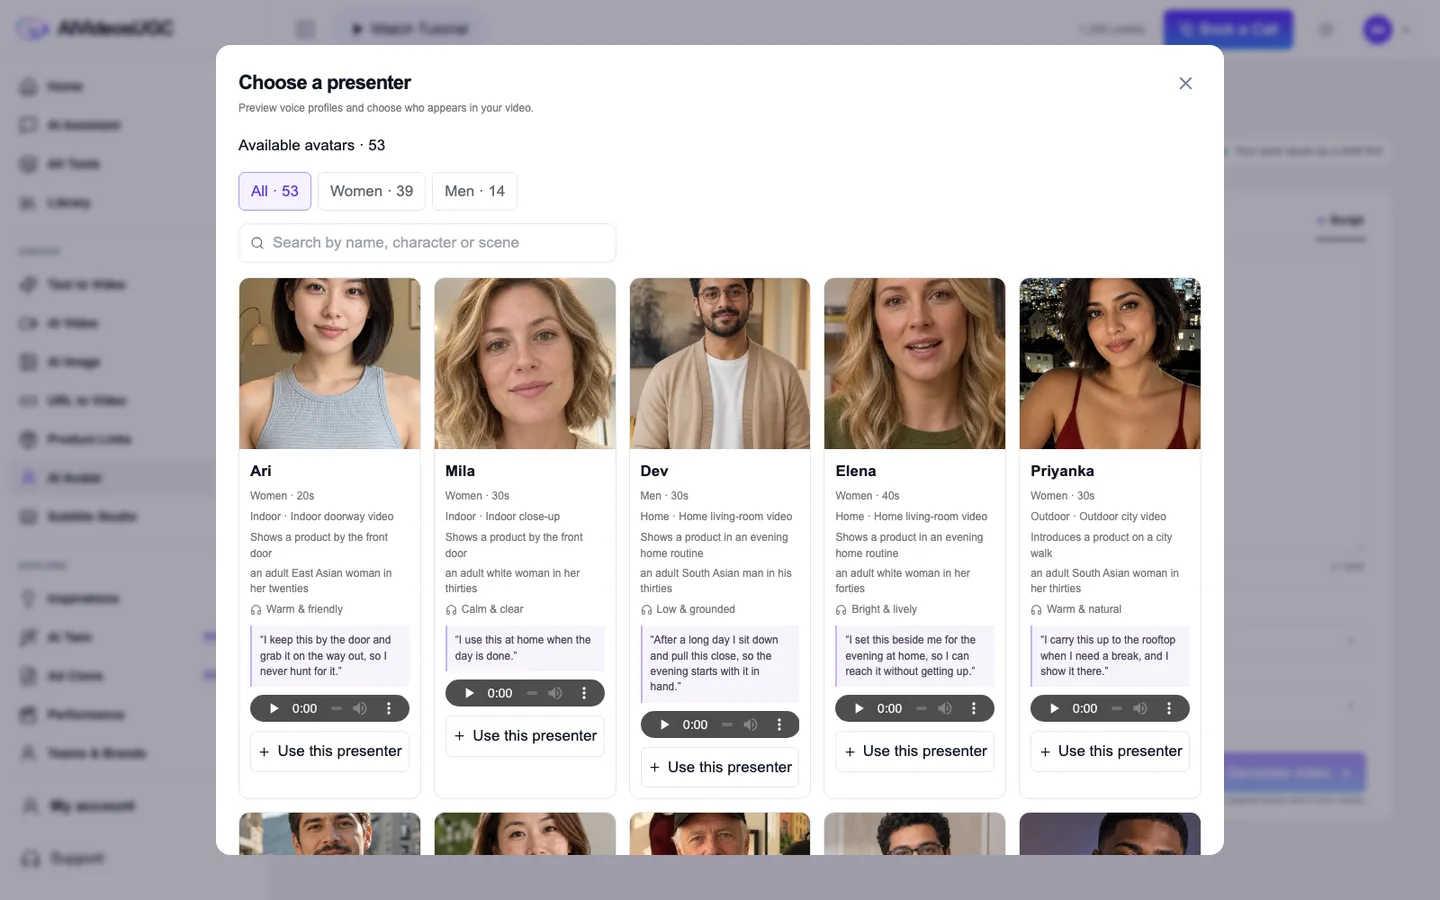
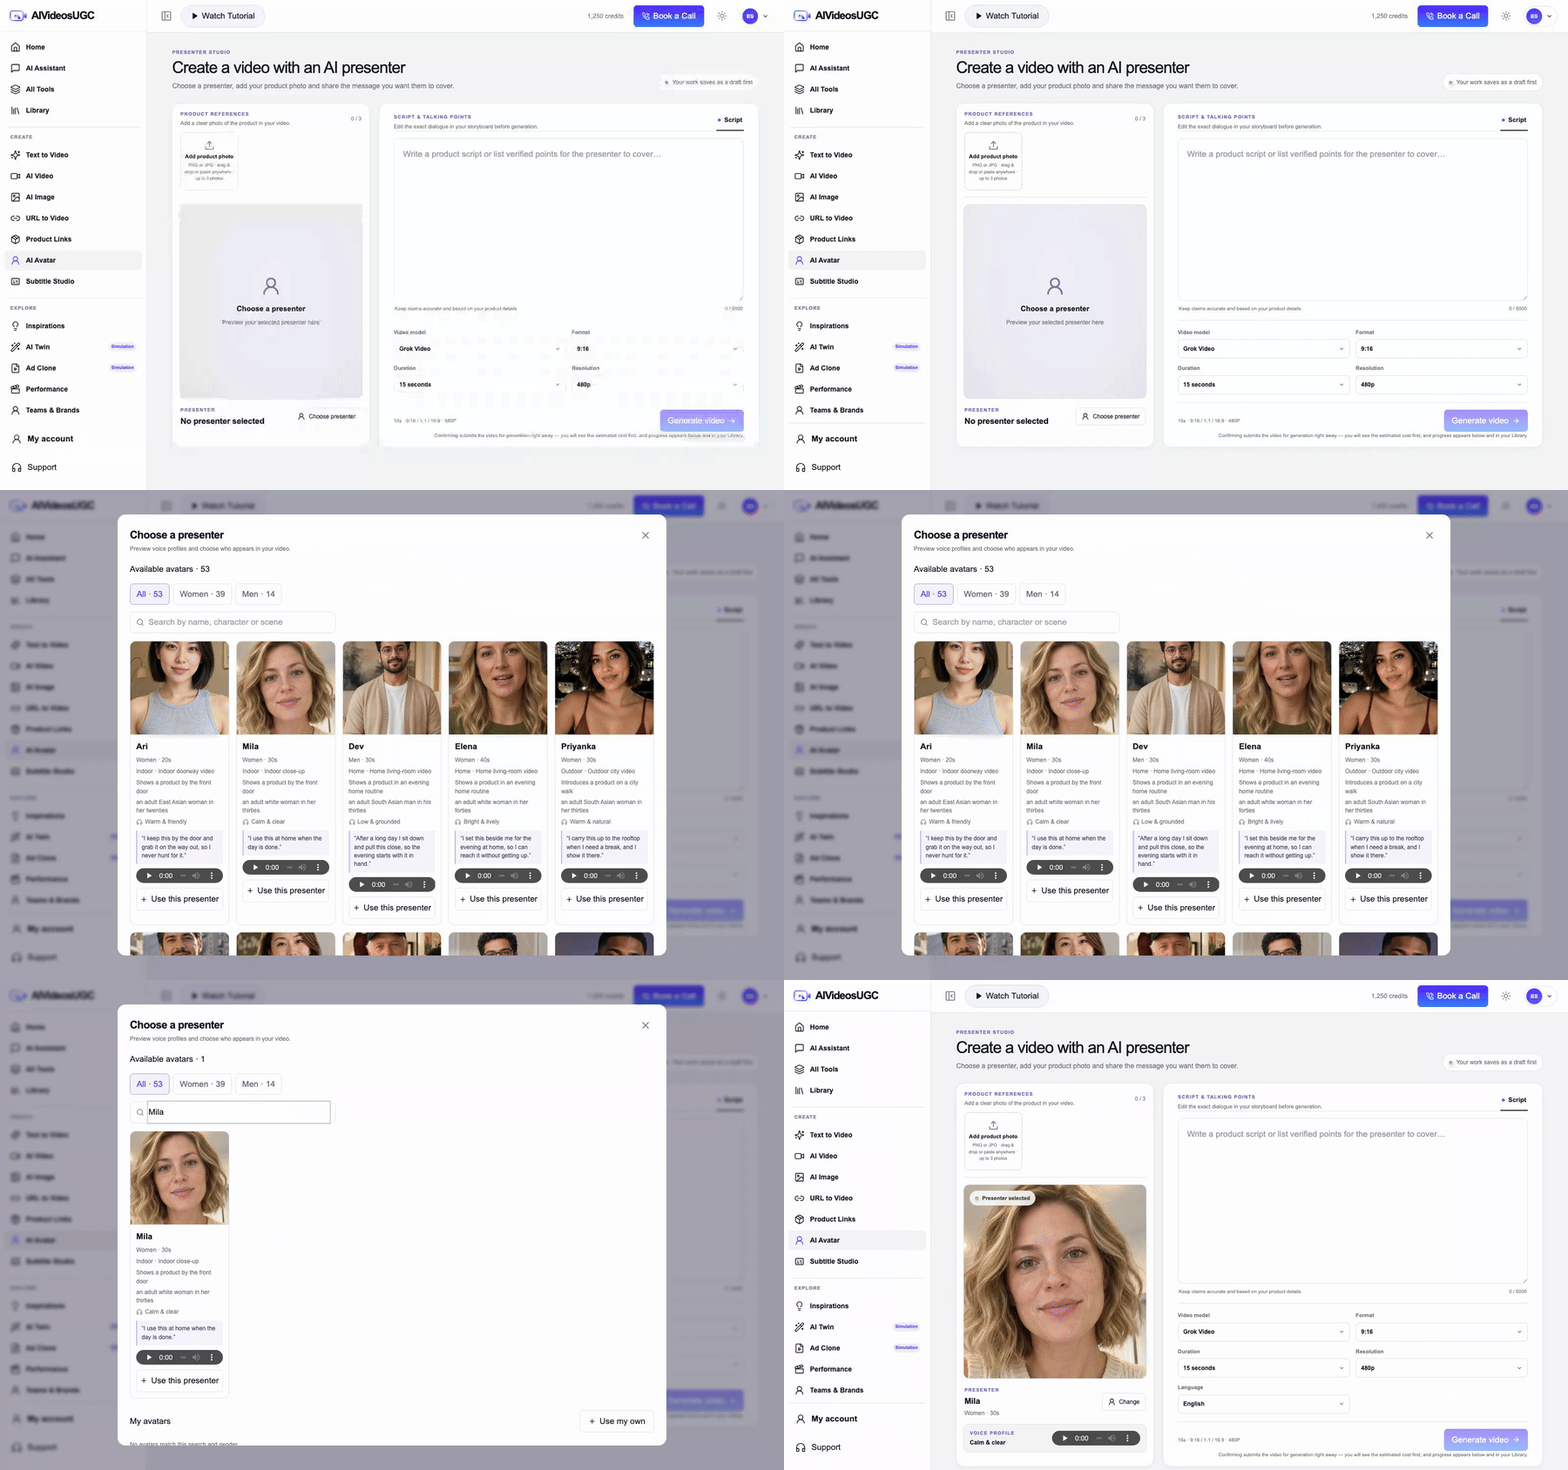
Pick a presenter (or upload your own portrait), attach the product, write the script, and the studio produces a talking-head product video. Every presenter card carries a voice profile and a sample line with audio — listen before you commit.
Attach product references
Drag or paste the product photos the presenter will hold, wear or demonstrate.
Choose a presenter
Available avatars · 53, filtered All / Women / Men with search by name, character or scene. Each card previews the voice and shows a sample line;
Use this presentercasts them. My avatars lets you upload your own portrait.Write the script
Talking points or a full script (up to 5,000 characters), then set format, duration and spoken language.
Quote, confirm, generate
The confirm modal shows estimated cost against balance — same core loop as every tool.
Subtitle Studio
Route /app/create/subtitles · versions, not re-renders
Subtitle Studio works on finished videos. Each operation creates a new version of the video — the original is never overwritten — and long jobs keep running while you work elsewhere in the workspace.
Pick a finished video
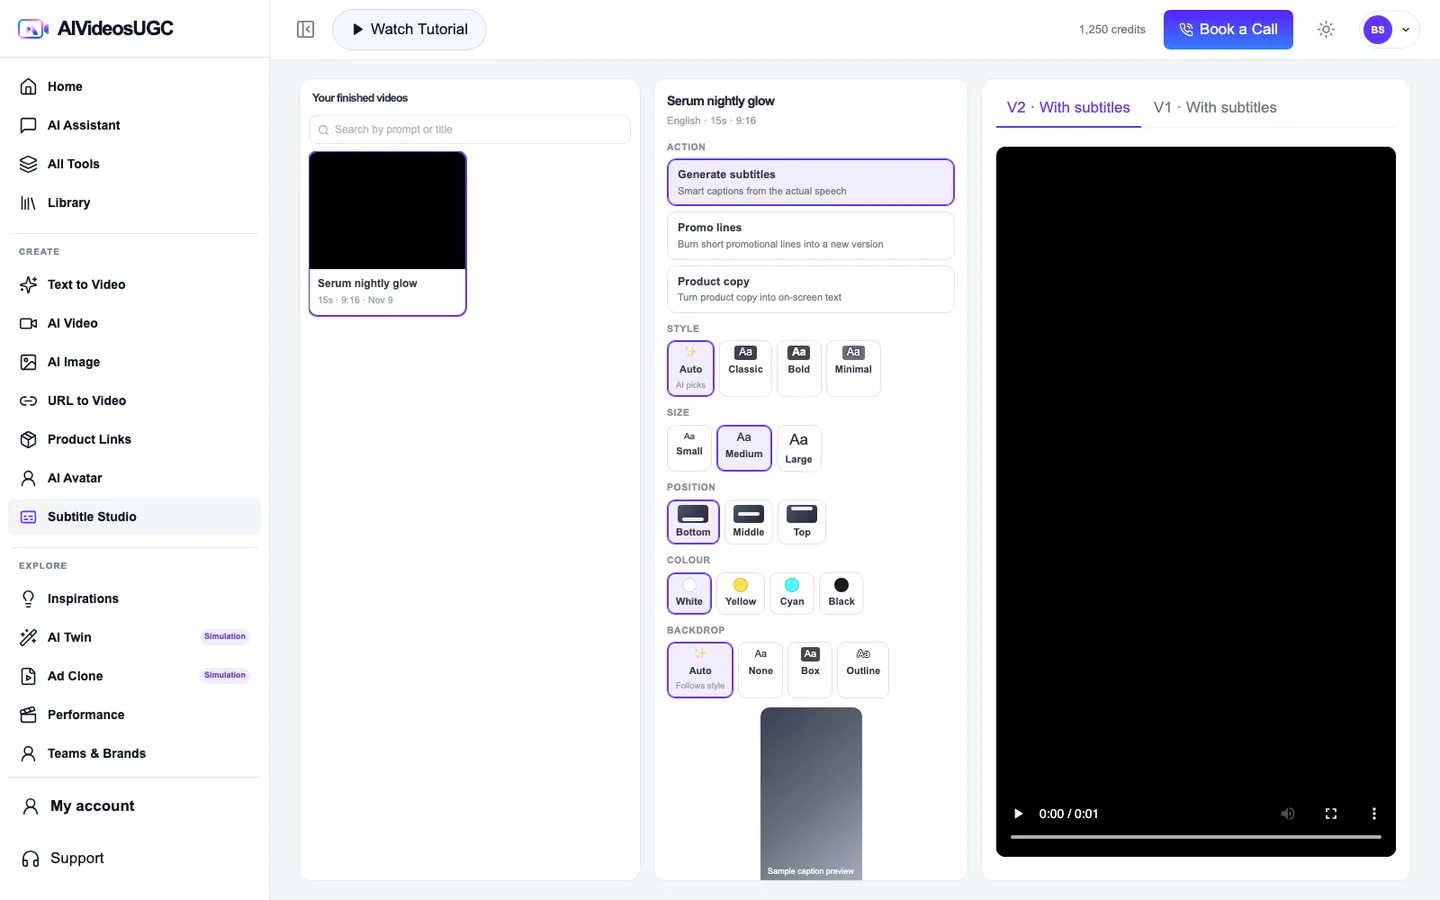
The left list shows completed videos only — search by prompt or title, page through your history.
Choose an operation
Generate subtitles — smart captions from the actual speech. Promo lines — burn short promotional lines into a new version. Product copy — turn product copy into on-screen text. The last two accept your own text, one line per screen.
Style it with live preview
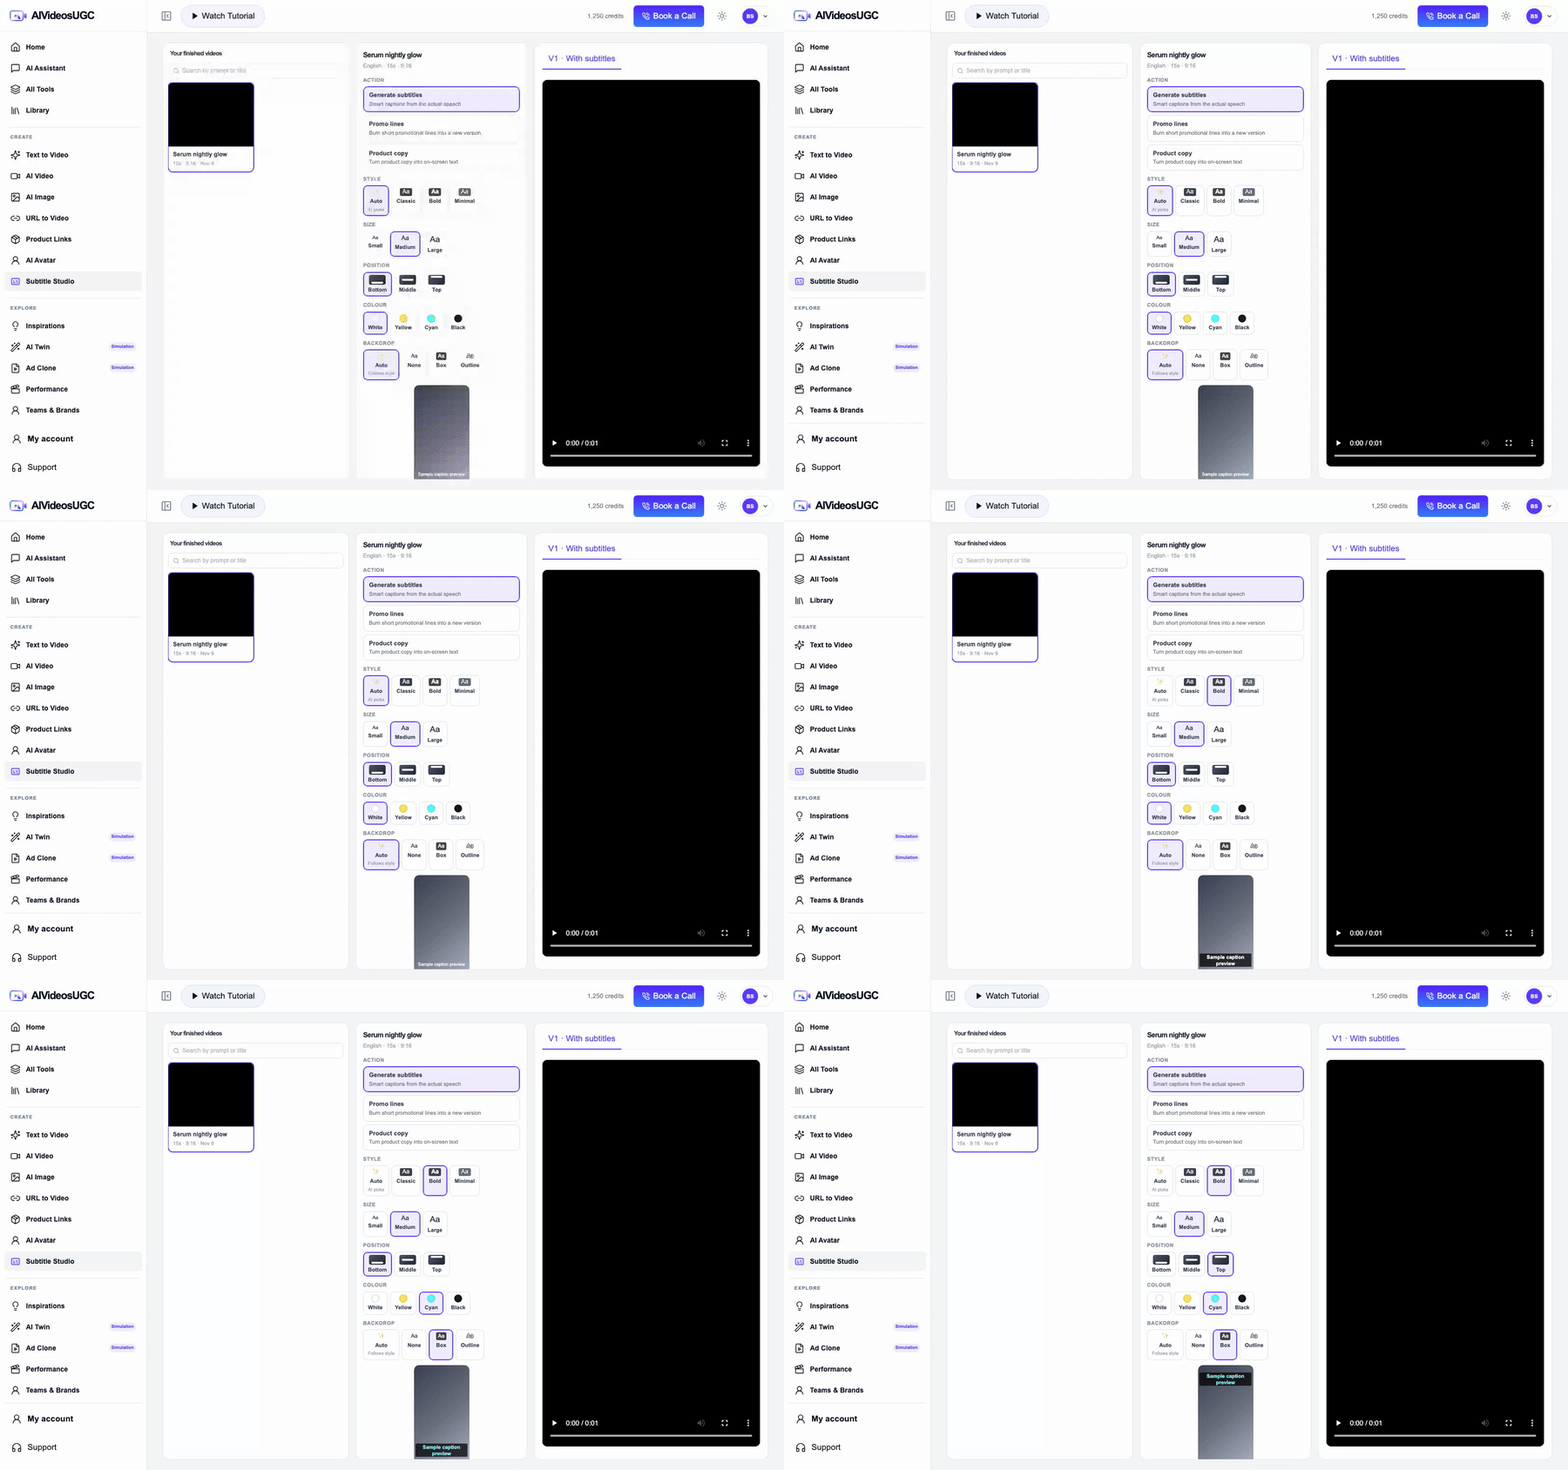
STYLE Auto / Classic / Bold / Minimal · SIZE Small / Medium / Large · POSITION Bottom / Middle / Top · COLOUR White / Yellow / Cyan / Black · BACKDROP Auto / None / Box / Outline — the sample caption preview updates as you click.
Generate a new version
The job runs server-side; a pill elsewhere in the workspace tells you it's still going. Versions stack as tabs over the player — V2 · With subtitles, V1 · With subtitles…
Good to know Submit a long batch of subtitle jobs first — the pill keeps you informed while you generate your next video elsewhere.
Library
Route /app/create/library · every job, one list
The Library is the single source of truth for video jobs: filters, the details modal, retries and the 15-day retention clock. If a result exists, it lives here.
Filter the list
All videos / In progress / Failed / Completed, with infinite scroll and a reference-reel strip of the images your jobs used. The filter row is captured in chapter 01.
Open the details modal
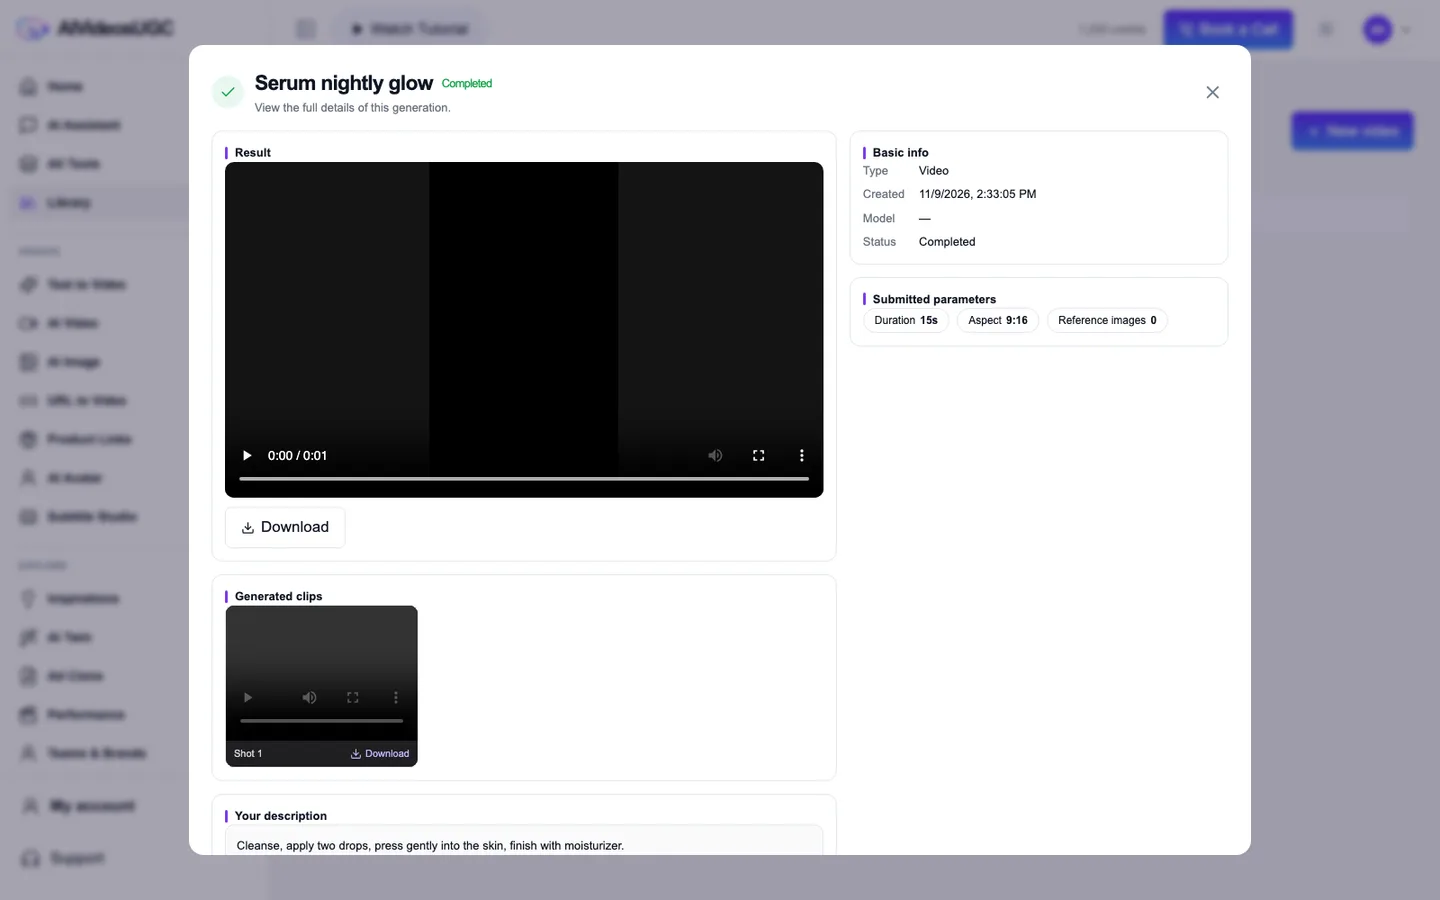
View detailson any card opens the result video, per-shot clips, description, every reference you attached and the exact submitted parameters — duration, aspect, resolution, refs.Fix a failure the right way
Retry render re-runs assembly when the clips are fine (failed render, finished clips). Regenerate prefills the composer from the job for a fresh attempt. Failed jobs explain themselves in plain language.
Delete deliberately
Delete asks for confirmation and uses a revision check, so two open tabs can't delete the same job twice. Everything auto-expires after 15 days.
Assistant, extras & your account
Routes /app/create (assistant) · Inspirations, Performance, Teams & Brands, Developer access in the workspace sidebar · /account
The supporting cast: an assistant for scripts and shot ideas, an inspiration gallery that hands its cards straight into your composer, the tools that turn finished videos into decisions — performance, teams, and API access — and the account page where credits and receipts live.
Brief the assistant
Suggestion chips start the conversation — a 15-second product video script, three shot ideas, a UGC-style voiceover, a stronger first three seconds. Replies stream as you read. It advises; it doesn't generate.
Borrow from Inspirations
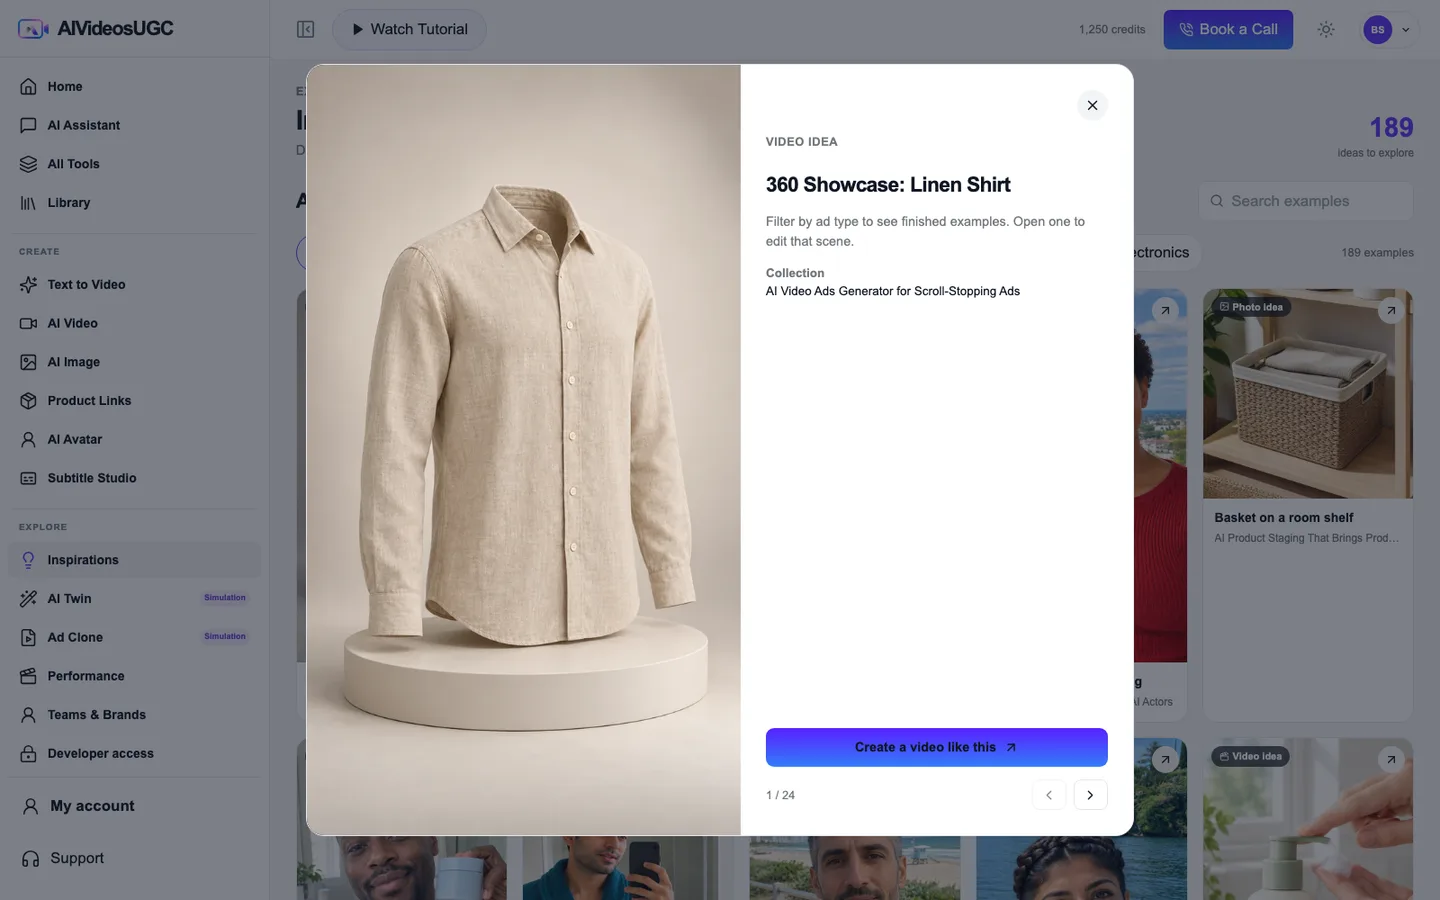
Filter the gallery by video or photo idea, search by category, and open a card that catches your eye. The detail dialog hands the setup straight into your workspace with
Create a video like thisorCreate an image like this.Compare your ad results
Performance imports your advertising results and lines them up by period: a performance overview plus a breakdown by creative, so you can see which video actually drove results before you make the next one.
Manage teams & brands
Teams & Brands is where workspace access, brand details and product information you have reviewed live — the shared facts every teammate's videos build on.
Connect with the API
Developer access issues API keys and webhook endpoints. Keys carry scopes; task creation asks for a unique
Idempotency-Keyheader so a retry refers to the same operation.Watch your credits
The toolbar chip shows your balance and refreshes after every paid operation. The account page holds credits, purchases and receipts.
Get help
Support opens a dialog with a four-step getting-started guide ("Create a product video in four steps") and a Book-a-Call path to a human.
Heads-up Two sidebar items are marked Simulation — AI Twin and Ad Clone. They let you try the workflows on sample data; neither produces a real video today.
Go deeper
Five focused guides live under this page — each one takes a single job and walks it through end to end.